百度云智峰会Workshop技术干货第1弹 ——文本目标检测实验介绍
作者:HelloDeveloper2019.10.11 23:12浏览量:3395简介:8月29日下午,在热烈的气氛中,2019百度云智峰会在北京顺利举办。活动现场,百度开发者中心联手百度云智学院,为开发者及学生们,提供了展示自己的舞台,输出百度沉
8月29日下午,在热烈的气氛中,2019百度云智峰会在北京顺利举办。活动现场,百度开发者中心联手百度教育合作与共建,为开发者及学生们,提供了展示自己的舞台,输出百度沉淀的优质技术。百度开发者中心(developer.baidu.com)专注于为开发者打造一个有温度的技术交流社区,一直伴随着中国开发者的成长,通过分享知识、交流。自成立以来,坚持为广大开发者提供优质服务。百度教育合作与共建(abcxueyuan.baidu.com)作为百度对外知识赋能的平台,依托百度ABC战略,整合内外部优质教育培训资源,定义满足产业需求的人才标准和培训体系,以“AI引领未来,茁壮科技人才”为使命,致力于为ABC时代的人才培养、技术分享等问题提供全新的解决思路。
为了帮助大家更好地理解Workshop中亮相的6大技术,我们特将技术内容进行梳理总结,出品6篇技术干货文章,在近期于百度开发者中心公众号(ID:baidudev)上逐一分享给大家,请大家持续关注。以下是第一期内容《文本目标检测实验介绍》。
BML平台简介
BML是一款企业级的机器学习平台,提供一站式人工智能建模与推理预测服务。面向用户提供机器学习和深度学习服务能力,实现从数据集管理、数据预处理、数据源、模型训练,到模型管理、预测服务、服务监控等全AI工作周期的管理。平台提供交互式、拖拽式、任务式 等多种建模方式,适合不同AI研发能力的用户快速实现模型训练、评估和预测,解决各类业务场景的 AI 功能开发需要,是构建企业AI服务的基石,助力产业智能化转型。
实验简介
OCR(光学字符识别)是指电子设备(例如扫描仪或数码相机)检查纸上打印的字符,通过检测暗、亮的模式确定其形状,然后用字符识别方法将形状翻译成计算机文字的过程。本次实验在百度智能云AI开发平台BML上实现了OCR检测的过程,实验基于开源的COCO-Text数据集和Tensorflow训练框架实现了生活场景的文本目标检测和分类算法。数据预处理和模型训练是通过云上Notebook工作区模块来完成的,训练结束以后产出Tensorflow模型,通过百度智能云上BML预测服务可以对已生成的模型进行在线预测服务的部署与调试发布。
1、数据源介绍:COCO-Text开源场景数据,大型的目标检测、语义分割图片数据集
2、实验内容:采用Faster R-CNN+ResNet101网络,进行OCR文本检测
a.登录机器学习平台BML
b.Notebook:数据集格式转化->模型训练->离线预测
c.预测服务:在线预测服务部署,调试
实验过程
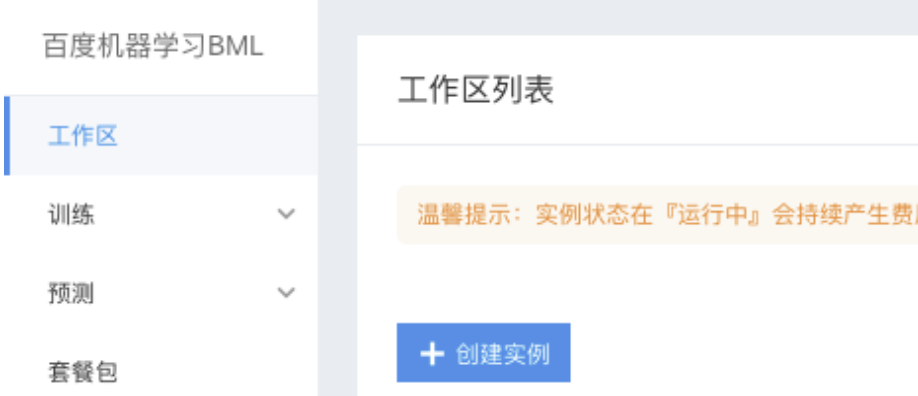
登录百度智能云
登录百度智能云,选择'百度机器学习BML'产品,选中工作区以后,创建Notebook实例。


环境准备
实验环境要求Tensorflow V1.12.0以上版本,以及下载Tensorflow目标检测API的库。同时需要安装PIL,Matplotlib,dask等python库。首先在运行在运行前import相应的python库。
import numpy as np
import os
import sysimport tensorflow as tf
from distutils.version import StrictVersion
from collections import defaultdict
from io import StringIO
from matplotlib import pyplot as plt
from PIL import Image
sys.path.append("./models/research/")
from object_detection.utils import ops as utils_ops
from object_detection.utils import label_map_util
from object_detection.utils import visualization_utils as vis_util
数据集转换
原始数据集是处理以后的COCO数据集格式,在使用Tensorflow训练之前需要先把COCO数据集转换为对应的TFRecord格式,用于后续的模型训练。
!PYTHONPATH='./models/research/':'./models/research/slim':$PYTHONPATH
python./models/research/object_detection/dataset_tools/create_coco_tf_record.py --logtostderr \
--include_masks=True \
--train_image_dir="./coco_ocr_multi/images/" \
--val_image_dir="./coco_ocr_multi/images/" \
--test_image_dir="./coco_ocr_multi/images/" \
--train_annotations_file="./coco_ocr_multi/json/train_jiaozheng.json" \
-val_annotations_file="./coco_ocr_multi/json/val_jiaozheng.json" \
--testdev_annotations_file="./coco_ocr_multi/json/val_jiaozheng.json" \ --output_dir="./coco_tf_record/"
模型训练
使用Tensorflow的model_main.py来尝试训练,这里采用Faster R-CNN+ResNet101网络,训练约10000步即可收敛。训练过程中使用预先下载Faster R-CNN预训练模型,`data/faster_rcnn_resnet101_ocr.config`中保存了PIPELINE的配置信息。这里为了加速训练过程,这里`NUM_TRAIN_STEPS`设置为10,并在`sys_final_model`目录中保存了一个预先训练好10000步的模型。
%env PIPELINE_CONFIG_PATH=data/faster_rcnn_resnet101_ocr.config
%env MODEL_DIR=user_final_model%
env NUM_TRAIN_STEPS=10000
%env SAMPLE_1_OF_N_EVAL_EXAMPLES=1
!PYTHONPATH='./models/research/':'./models/research/slim':$PYTHONPATH
python ./models/research/object_detection/model_main.py \
--pipeline_config_path=${PIPELINE_CONFIG_PATH} \
--model_dir=${MODEL_DIR} \
--num_train_steps=${NUM_TRAIN_STEPS} \
--sample_1_of_n_eval_examples=$SAMPLE_1_OF_N_EVAL_EXAMPLES \
--alsologtostderr
模型转换
使用export_inference_graph.py工具来进行预测模型转换,这里我们使用已经训练好的多类目标检测模型来,该模型主要采用Faster R-CNN 完成多类的目标检测。其他模型可在 detection model zoo中。 使用export_inference_graph.py工具完成checkpoint转化为fronzen_graph以及Tensorflow Serving 使用的model
%env INPUT_TYPE=image_tensor
%env PIPELINE_CONFIG_PATH=data/faster_rcnn_resnet101_ocr.config
%env TRAINED_CKPT_PREFIX=user_final_model/model.ckpt-10000
%env EXPORT_DIR=export_inference_model
!PYTHONPATH='./models/research/':'./models/research/slim':$PYTHONPATH
python ./models/research/object_detection/export_inference_graph.py \
--input_type=${INPUT_TYPE} \
--pipeline_config_path=${PIPELINE_CONFIG_PATH} \
--trained_checkpoint_prefix=${TRAINED_CKPT_PREFIX} \
--output_directory=${EXPORT_DIR}
离线预测
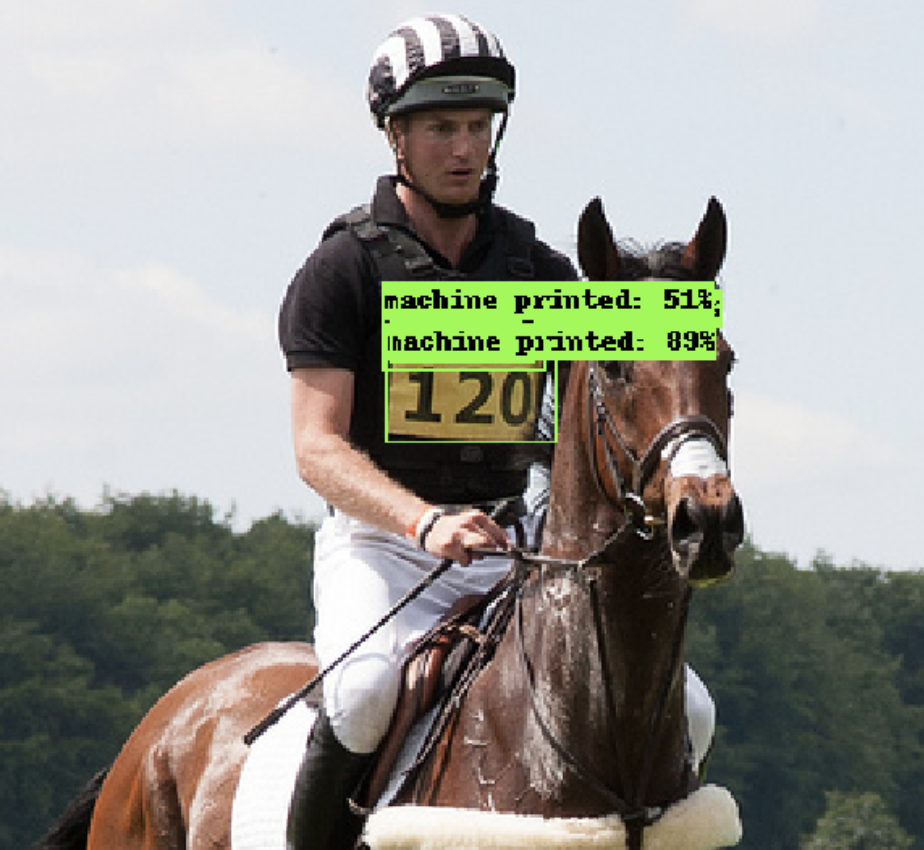
配置预测数据路径,加载已有模型到内存, 构建Tensorflow预测图,把图片转为numpy格式输入预测程序,最终预测出来的程序中包含有detection_classes、num_detections、detection_boxes等信息。最后通过自带的matplotlib库加载预测图片,并根据预测出来以后的结果进行可视化的展示。
PATH_TO_TEST_IMAGES_DIR = 'test_images'
TEST_IMAGE_PATHS = [ os.path.join(PATH_TO_TEST_IMAGES_DIR, 'image{}.jpg'.format(i)) for i in range(1, 4) ]
# Size, in inches, of the output images.
IMAGE_SIZE = (20, 20)
def run_inference_for_single_image(image, graph):
with graph.as_default():
with tf.Session() as sess:
# Get handles to input and output tensors
ops = tf.get_default_graph().get_operations()
all_tensor_names = {output.name for op in ops for output in op.outputs}
tensor_dict = {}
for key in [
'num_detections', 'detection_boxes', 'detection_scores', 'detection_classes', 'detection_masks' ]:
tensor_name = key + ':0'
if tensor_name in all_tensor_names:
tensor_dict[key] = tf.get_default_graph().get_tensor_by_name(
tensor_name)
if 'detection_masks' in tensor_dict:
# The following processing is only for single image detection_boxes = tf.squeeze(tensor_dict['detection_boxes'], [0])
detection_masks = tf.squeeze(tensor_dict['detection_masks'], [0])
# Reframe is required to translate mask from box coordinates to image coordinates and fit the image size.
real_num_detection = tf.cast(tensor_dict['num_detections'][0], tf.int32)
detection_boxes = tf.slice(detection_boxes, [0, 0], [real_num_detection, -1])
detection_masks = tf.slice(detection_masks, [0, 0, 0], [real_num_detection, -1, -1])
detection_masks_reframed = utils_ops.reframe_box_masks_to_image_masks(
detection_masks, detection_boxes, image.shape[1], image.shape[2])
detection_masks_reframed = tf.cast( tf.greater(detection_masks_reframed, 0.5), tf.uint8)
# Follow the convention by adding back the batch dimension
tensor_dict['detection_masks'] = tf.expand_dims( detection_masks_reframed, 0)
image_tensor = tf.get_default_graph().get_tensor_by_name('image_tensor:0')
# Run inference
output_dict = sess.run(tensor_dict,
feed_dict={image_tensor: image})
# all outputs are float32 numpy arrays, so convert types as appropriate
output_dict['num_detections'] = int(output_dict['num_detections'][0])
output_dict['detection_classes'] = output_dict[ 'detection_classes'][0].astype(np.int64) output_dict['detection_boxes'] = output_dict['detection_boxes'][0]
output_dict['detection_scores'] = output_dict['detection_scores'][0]
if 'detection_masks' in output_dict: output_dict['detection_masks'] = output_dict['detection_masks'][0] return output_dict
最终预测结果输出如下:


在线预测
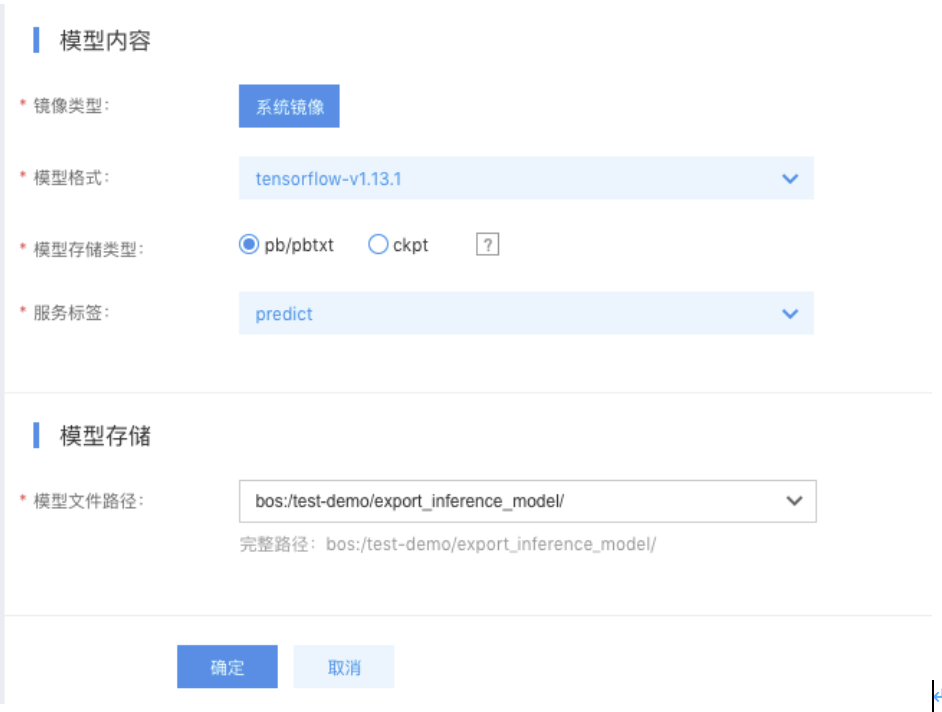
在线预测服务首先新建预测模板库,在预测模型库中新建模型,新建的时候选择Tensorflow V1.13版本,指定模型在对象存储BOS的路径地址。
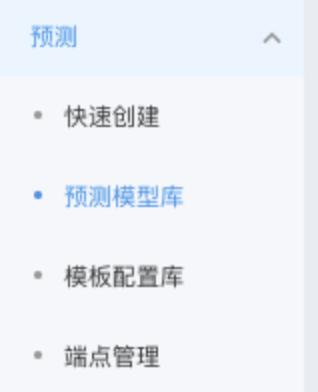
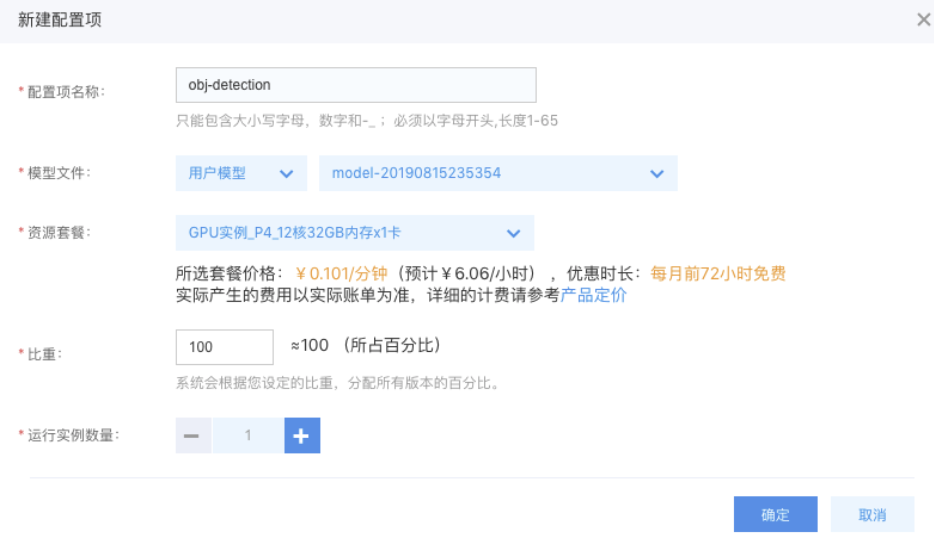
然后在模板配置库中创建预测模板,把之前创建的模型作为其中一个配置项加入到模板中,创建配置项的时候可以指定流量比重以及选择多种硬件资源套餐。
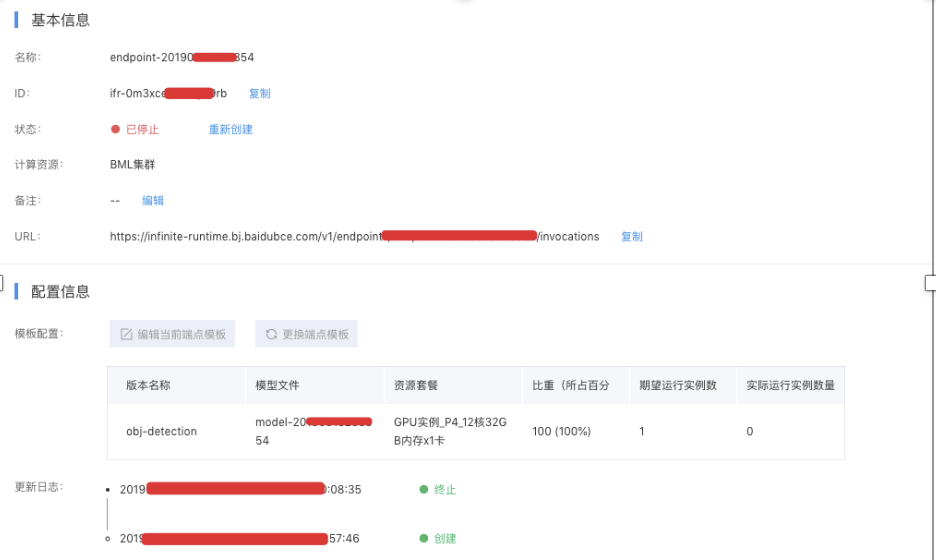
最后创建实际的预测端点,即在线服务预测,在线服务预测会返回预测的基本信息和预测地址,用户可以通过自己的AK、SK创建预测请求来进行使用。
相关文章推荐
发表评论
关于作者

- 被阅读数
- 被赞数
- 被收藏数
登录后可评论,请前往 登录 或 注册