5分钟学习Linux查找命令,让你1分钟查找任何文件
2021.07.12 15:32浏览量:642简介:Linux下查找命令主要有which,find。下面我们一一去介绍它们的使用方法。
来源:浩道linux
我们都知道linux系统一切皆文件,因此整个系统的文件数量相当巨大,而且基本都是处于命令行模式下,因此如果单单依赖切换目录的方式去找到某个文件并不容易,快速高效找到我们想要的文件更是难上加难,所以就要我们掌握Linux下的查找命令,此时方能让我们在文件的海洋有如探囊取物。
Linux下查找命令主要有which,find。下面我们一一去介绍它们的使用方法。
which主要用于命令的查找,从PATH环境变量去查找,如下图输入命令所示: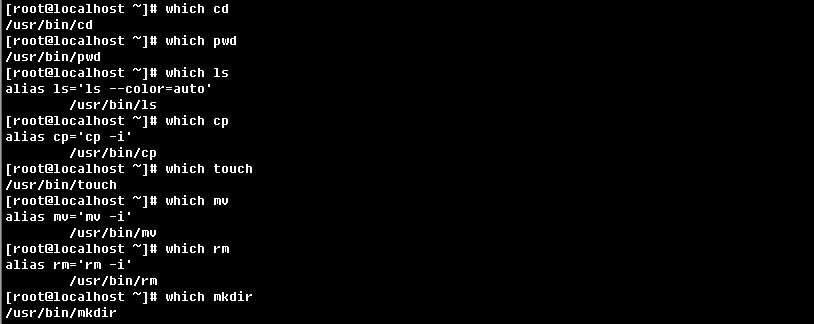
find命令主要用于查找文件,是最常用的,因此我们的重点也是要掌握该命令。find命令具体用法如下:
- find [查找路径] [选项参数] [表达式] [动作]
常见的选项参数有:
1、-name:即按照文件名字查找,名字可以带通配符
- [root@localhost ~]# find /etc/ -name “network”
- /etc/sysconfig/network
- /etc/rc.d/init.d/network
- [root@localhost ~]# find /etc/ -iname netwo*
- /etc/systemd/system/multi-user.target.wants/NetworkManager.service
- /etc/networks
- /etc/sysconfig/network-scripts
- /etc/sysconfig/network-scripts/network-functions
- /etc/sysconfig/network-scripts/network-functions-ipv6
- /etc/sysconfig/network
- /etc/NetworkManager
- /etc/NetworkManager/NetworkManager.conf
- /etc/rc.d/init.d/network
- /etc/selinux/targeted/active/modules/100/networkmanager
2、-iname:按照文件名字查找,忽略文件名字大小写
- [root@localhost ~]# find /etc/ -iname “Network”
- /etc/sysconfig/network
- /etc/rc.d/init.d/network
3、-size:按照文件大小进行查找
- [root@localhost ~]# find /etc/ -size +5M
- /etc/udev/hwdb.bin
查找在/etc/目录(及子目录)下查找文件大小大于5M的文件
通过ls -lh验证查找到的文件大小,如下图:
- [root@localhost ~]# find ./ -size -5M
- ./
- ./.bash_logout
- ./.bash_profile
- ./.bashrc
- ./.cshrc
- ./.tcshrc
- ./anaconda-ks.cfg
- ./.bash_history
- ./.pki
- ./.pki/nssdb
- ./.mysql_history
- ./tmp
- ./tmp/date.txt
- ./20210626.txt
- [root@localhost ~]#
经过以上命令得出,+5M表示要查找大于5M的文件,-5M表示要查找小于5M的文件,5M表示要查找等于5M的文件。
4、-maxdepth:按照指定查找的目录深度进行查找,后面跟数字表示几级目录。
- [root@localhost ~]# find / -maxdepth 2 -name ifcfg-eno16777736
- [root@localhost ~]# find / -maxdepth 3 -name ifcfg-eno16777736
- [root@localhost ~]# find / -maxdepth 4 -name ifcfg-eno16777736
- /etc/sysconfig/network-scripts/ifcfg-eno16777736
- [root@localhost ~]#
5、-user:按照文件属主进行查找,后跟实际用户名username
- [root@localhost ~]# find /home/haodao1/ -user haodao1
- /home/haodao1/
- /home/haodao1/.bash_logout
- /home/haodao1/.bash_profile
- /home/haodao1/.bashrc
- [root@localhost ~]#
表示查找/home/haodao1/目录下属于haodao1用户的文件,验证如下: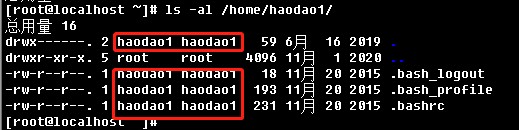
6、-group:按照文件属组进行查找,后跟实际组名groupname
- [root@localhost ~]# find /home/ -group haodao1
- /home/haodao1
- /home/haodao1/.bash_logout
- /home/haodao1/.bash_profile
- /home/haodao1/.bashrc
- [root@localhost ~]#
7、-type:按照文件类型查找,后接文件类型( b,d,c,p,l,f 分别对应的文件类型是块设备、目录、字符设备、管道、符号链接、普通文件)
- [root@localhost ~]# find /root/ -type l
- [root@localhost ~]# find /root/ -type b
- [root@localhost ~]# find /root/ -type d
- /root/
- /root/.pki
- /root/.pki/nssdb
- /root/tmp
- [root@localhost ~]# find /root/ -type f
- /root/.bash_logout
- /root/.bash_profile
- /root/.bashrc
- /root/.cshrc
- /root/.tcshrc
- /root/anaconda-ks.cfg
- /root/.bash_history
- /root/.mysql_history
- /root/tmp/date.txt
- /root/20210626.txt
- [root@localhost ~]#
8、-perm:按照文件进行查找,后面跟权限的三位数字
- [root@localhost ~]# find ./ -perm 755
- ./tmp

9、-mtime:按文件更改时间来查找文件,后面跟天数,-n指n天以内,+n指n天以前 - [root@localhost ~]# find /var -mtime -5
10、-atime:按文件访问时间来查找文件,后面跟天数,-n指n天以内,+n指n天以前
11-ctime:按文件创建时间来查找文件,后面跟天数,-n指n天以内,+n指n天以前
关于find命令的用法还有很多,但是掌握以上的命令用法,我们基本就可以找到我们需要的任何文件了,故这里留给大家自己去了解即可。我们都知道linux系统一切皆文件,因此整个系统的文件数量相当巨大,而且基本都是处于命令行模式下,因此如果单单依赖切换目录的方式去找到某个文件并不容易,快速高效找到我们想要的文件更是难上加难,所以就要我们掌握Linux下的查找命令,此时方能让我们在文件的海洋有如探囊取物。

发表评论
登录后可评论,请前往 登录 或 注册